The Battle of Tarawa
The Battle of Tarawa–world history and facts
.jpg)
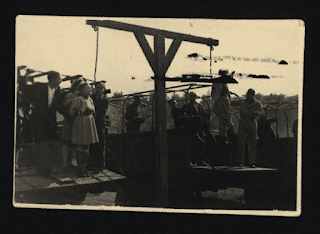
The Battle of Tarawa was fought on 20–23 November 1943 between the United States and Japan at the Tarawa Atoll in the Gilbert Islands, and was part of Operation Galvanic, the U.S. invasion of the Gilberts. Nearly 6,400 Japanese, Koreans, and Americans died in the fighting, mostly on and around the small island of Betio, in the extreme southwest of Tarawa Atoll.
The Battle of Tarawa was the first American offensive in the critical central Pacific region. It was also the first time in the Pacific War that the United States had faced serious Japanese opposition to an amphibious landing.
Previous landings met little or no initial resistance, but on Tarawa the 4,500 Japanese defenders were well-supplied and well-prepared, and they fought almost to the last man, exacting a heavy toll on the United States Marine Corps. The losses on Tarawa were incurred within 76 hours.
The Battle
November 20

The American invasion force to the Gilberts was the largest yet assembled for a single operation in the Pacific, consisting of 17 aircraft carriers (6 CVs, 5 CVLs, and 6 CVEs), 12 battleships, 8 heavy cruisers, 4 light cruisers, 66 destroyers, and 36 transport ships. On board the transports were the 2nd Marine Division and the Army's 27th Infantry Division, for a total of about 35,000 troops.

As the invasion flotilla hove to in the predawn hours, the island's four 8-inch guns opened fire. A gunnery duel soon developed as the main batteries on the battleships USS Colorado and USS Maryland commenced counter-battery fire.
This proved accurate, with several of the 16-inch shells finding their marks. One shell penetrated the ammunition storage for one of the guns, setting off a huge explosion as the ordnance went up in a massive fireball.
Three of the four guns were knocked out in short order. One continued its intermittent, though inaccurate, fire through the second day. The damage to the big guns left the approach to the lagoon open.
Following the gunnery duel and an air attack of the island at 06:10, the naval bombardment of the island began in earnest and was sustained for the next three hours.
Two minesweepers, with two destroyers to provide covering fire, entered the lagoon in the pre-dawn hours and cleared the shallows of mines.[15] A guide light from one of the minesweepers then guided the landing craft into the lagoon, where they awaited the end of the bombardment.
The plan was to land Marines on the north beaches, divided into three sections: Red Beach 1 on the far west of the island, Red Beach 2 in the center just west of the pier, and Red Beach 3 to the east of the pier.[16] Green Beach was a contingency landing beach on the western shoreline and was used for the D+1 landings.
Black Beaches 1 and 2 made up the southern shore of the island and were not used. The airstrip, running roughly east–west, divided the island into north and south.

Marine Corps battle planners had expected the normal rising tide to provide a water depth of 5 feet (1.5 m) over the reef, allowing their 4 feet (1.2 m) draft Higgins boats room to spare. However, on this day and the next, the ocean experienced a neap tide and failed to rise. In the words of some observers, "the ocean just sat there", leaving a mean depth of 3 feet (0.91 m) over the reef.
A New Zealand Army liaison officer, Major Frank Holland, had 15 years' experience of Tarawa and warned that there would be at most 3 feet depth due to the tides. Shoup warned his troops that there would be a 50–50 chance that they would need to wade ashore, but the attack was not delayed until more favorable spring tides.
The supporting naval bombardment lifted and the Marines started their attack from the lagoon at 09:00, thirty minutes later than expected, but found the tide had not risen enough to allow their shallow draft Higgins boats to clear the reef.[19] Only the tracked LVT "Alligators" were able to get across. With the pause in the naval bombardment, those Japanese who had survived the shelling were again able to man their firing pits.
Japanese troops from the southern beaches were shifted up to the northern beaches. As the LVTs made their way over the reef and into the shallows, the number of Japanese troops in the firing pits slowly began to increase, and the volume of combined arms fire the LVTs faced gradually intensified.
The LVTs had a myriad of holes punched through their non-armored hulls, and many were knocked out of the battle. Those 'Alligators' that did make it in proved unable to clear the sea wall, leaving the men in the first assault waves pinned down against the log wall along the beach.
A number of 'Alligators' went back out to the reef in an attempt to carry in the men who were stuck there, but most of these LVTs were too badly holed to remain seaworthy, leaving the Marines stuck on the reef some 500 yards (460 m) off shore. Half of the LVTs were knocked out of action by the end of the first day.
Colonel David Shoup was the senior officer of the landed forces, and he assumed command of all landed Marines upon his arrival on shore. Although wounded by an exploding shell soon after landing at the pier, Shoup had the pier cleared of Japanese snipers and rallied the first wave of marines who had become pinned down behind the limited protection of the sea wall.
Over the next two days, working without rest and under constant withering enemy fire, he directed attacks against strongly defended Japanese positions, pushing forward despite daunting defensive obstructions and heavy fire. Throughout, Shoup was repeatedly exposed to Japanese small arms and artillery fire, inspiring the forces under his command. For his actions on Betio, he was awarded the Medal of Honor.
Early attempts to land tanks for close support and to get past the sea wall failed when the LCM landing craft carrying them hung up behind the reef. Some of these craft were hit out in the lagoon while they waited to move in to the beach and either sank outright or had to withdraw while taking on water. Two Stuart tanks were landed on the east end of the beach, but were knocked out of action fairly quickly.
The battalion commander of 3rd Battalion, 2nd Regiment found several LCMs near the reef and ordered them to land their Sherman tanks and head to Red Beach 2. The LCMs dropped ramps and the six tanks came down, climbed over the reef and dropped into the surf beyond. They were guided in to shore by Marines on foot, but several of these tanks fell into holes caused by the naval gunfire bombardment and sank.
The surviving Shermans on the western end of the island proved considerably more effective than the lighter Stuarts. They helped push the line in to about 300 yards (270 m) from shore. One became stuck in a tank trap and another was knocked out by a magnetic mine. The remaining tank took a shell hit to its barrel and had its 75 mm gun disabled. It was used as a portable machine gun pillbox for the rest of the day. A third platoon was able to land all four of its tanks on Red 3 around noon and operated them successfully for much of the day, but by day's end only one tank was still in action.
By noon the Marines had successfully taken the beach as far as the first line of Japanese defenses. By 15:30 the line had moved inland in places but was still generally along the first line of defenses. The arrival of the tanks started the line moving on Red 3 and the end of Red 2 (the right flank, as viewed from the north), and by nightfall the line was about half-way across the island, only a short distance from the main runway.
In addition, Maj. Michael P. Ryan, a company commander, had gathered together remnants of his company with diverse disconnected Marines and sailors from other landing waves, as well as two Sherman tanks, and had diverted them onto a more lightly defended section of Green Beach. This impromptu unit was later referred to as "Ryan's Orphans". Ryan, who had been thought to be dead, arranged for naval gunfire and mounted an attack that cleared the island's western end.

The communication lines that the Japanese installed on the island had been laid shallowly and were destroyed in the naval bombardment, effectively preventing commander Keiji Shibazaki's direct control of his troops. In mid-afternoon, he and his staff abandoned the command post at the northeast end of the airfield, to allow it to be used to shelter and care for the wounded, and prepared to move to the south side of the island.
He had ordered two of his Type 95 light tanks to act as a protective cover for the move, but a 5-inch naval artillery shell exploded in the midst of his headquarters personnel as they were assembled outside the central concrete command post, resulting in the death of the commander and most of his staff. This loss further complicated Japanese command problems.
As night fell on the first day, the Japanese defenders kept up sporadic harassing fire, but did not launch an attack on the Marines clinging to their beachhead and the territory won in the day's hard fighting. With Rear Admiral Shibazaki killed and their communication lines torn up, each Japanese unit had been acting in isolation since the start of the naval bombardment.
The Marines brought a battery of 75 mm Pack Howitzers ashore, unpacked them and set them up for action for the next day's fight, but most of the second wave was unable to land.
They spent the night floating in the lagoon without food or water, trying to sleep in their Higgins boats. During the night, some Japanese marines swam to some of the wrecked LVTs in the lagoon, and to the Saida Maru (斉田丸), a wrecked Japanese steamship lying west of the main pier. They waited for dawn, when they intended to fire on U.S. forces from behind.
Lacking central direction, the Japanese were unable to coordinate for a counterattack against the toehold the Marines held on the island. The feared counterattack never came, and the marines held their ground. By the end of the first day, of the 5,000 Marines put ashore, 1,500 were casualties, either dead or wounded.
21 November

With the Marines holding a thin line on the island, they were commanded to attack Red Beach 2 and 3 and push inward and divide the Japanese defenders into two sections, expanding the bulge near the airfield until it reached the southern shore. Those forces on Red 1 were directed to secure Green Beach for the landing of reinforcements. Green Beach made up the entire western end of the island.
The effort to take Green Beach initially met with heavy resistance. Naval gunfire was called in to reduce the pill boxes and gun emplacements barring the way. Inching their way forward, artillery spotters were able to direct naval gunfire directly upon the machine gun posts and remaining strong points. With the major obstacles reduced, the marines were able to take the positions in about an hour of combat with relatively few losses.
Operations along Red 2 and Red 3 were considerably more difficult. During the night the defenders had set up several new machine gun posts between the closest approach of the forces from the two beaches, and fire from those machine gun nests cut off the American forces from each other for some time.
By noon the U.S. forces had brought up their own heavy machine guns, and the Japanese posts were put out of action. By the early afternoon they had crossed the airstrip and had occupied abandoned defensive works on the south side.
Around 12:30 a message arrived that some of the defenders were making their way across the sandbars from the extreme eastern end of the islet to Bairiki, the next islet over.
Portions of the 6th Marine Regiment were then ordered to land on Bairiki to seal off the retreat path. They formed up, including tanks and pack artillery, and were able to start their landings at 16:55. They received machine gun fire, so aircraft were sent in to try to locate the guns and suppress them.
The force landed with no further fire, and it was later found that only a single pillbox with 12 machine guns had been set up by the forces that had been assumed to be escaping. They had a small tank of gasoline in their pillbox, and when it was hit with fire from the aircraft the entire force was burned. Later, other units of the 6th were landed unopposed on Green Beach, north (near Red Beach 1).
By the end of the day, the entire western end of the island was in U.S. control, as well as a fairly continuous line between Red 2 and Red 3 around the airfield aprons. A separate group had moved across the airfield and set up a perimeter on the southern side, up against Black 2.
The groups were not in contact with each other, with a gap of over 500 yards (460 m) between the forces at Red 1/Green and Red 2, and the lines on the northern side inland from Red 2/Red 3 were not continuous.
22 November
The third day of battle consisted primarily of consolidating existing lines along Red 1 and 2, an eastward thrust from the wharf, and moving additional heavy equipment and tanks ashore onto Green Beach at 08:00.
During the morning the forces originally landed on Red 1 made some progress towards Red 2 but took casualties. Meanwhile, the 6th Marines which had landed on Green Beach to the south of Red 1 formed up while the remaining battalion of the 6th landed.
By the afternoon the 1st Battalion, 6th Marines were sufficiently organized and equipped to take to the offensive. At 12:30 they pressed the Japanese forces across the southern coast of the island. By late afternoon they had reached the eastern end of the airfield and had formed a continuous line with the forces that landed on Red 3 two days earlier.
By the evening the remaining Japanese forces were either pushed back into the tiny amount of land to the east of the airstrip, or operating in several isolated pockets near Red 1/Red 2 and near the western edge of the airstrip.
That night the Japanese forces formed up for a counterattack, which started at about 19:30. Small units were sent in to infiltrate the U.S. lines in preparation for a full-scale assault.
The assembling forces were broken up by concentrated artillery fire, and the assault never took place. Another attempt, a large banzai attack, was made at 03:00 and met with some success, killing 45 Americans and wounding 128. With support from the destroyers Schroeder and Sigsbee, the Marines killed 325 Japanese attackers.
23 November
At 04:00 the Japanese attacked Major Jones' 1st Battalion 6th Marines in force. Roughly 300 Japanese troops launched a banzai charge into the lines of A and B Companies. Receiving support from 1st Battalion 10th Marines' 75mm pack howitzers and the destroyers Schroeder and Sigsbee, the Marines were able to beat back the attack but only after calling artillery to within 75 meters of their own lines.
When the assault ended about an hour later there were 200 dead Japanese soldiers in the Marine front lines and another 125 beyond their lines. At 07:00 navy fighters and dive bombers started softening up the Japanese positions on the eastern tip of the island. After 30 minutes of air attack the pack howitzers of 1/10 opened up on the Japanese positions.
Fifteen minutes later the Navy kicked off the last part of the bombardment with a further 15 minutes of shelling. At 08:00 3rd Battalion 6th Marines under the command of Lt. Col. McLeod attacked, Jones' 1/6 having been pulled off the line after suffering 45 killed and 128 wounded in the previous night's fighting. Due to the narrowing nature of the island, I and L Companies of 3/6 formed the entire Marine front with K Company in reserve.
The Marines advanced quickly against the few Japanese left alive on the eastern tip of Betio. They had two Sherman tanks named Colorado and China Gal, 5 light tanks in support and engineers in direct support.
I and L Companies advanced 350 yards (320 m) before experiencing any serious resistance in the form of connected bunkers on I Company's front. McLeod ordered L Company to continue their advance, thereby bypassing the Japanese position.
At this point L Company made up the entire front across the now 200 yards (180 m) wide island, while I Company reduced the Japanese strong point with the support of the tank Colorado and attached demolition/flame thrower teams provided by the engineers. As the I Company Marines closed in, the Japanese broke from cover and attempted to retreat down a narrow defile.
Alerted to the attempted retreat, the commander of the Colorado tank fired in enfilade at the line of fleeing soldiers. The near total destruction of the Japanese soldiers' bodies made it impossible to know how many men were killed by this single shot, but it was estimated that 50 to 75 men perished.
While 3/6's L Company advanced down the eastern end of the island, Major Schoettel's 3rd Battalion 2nd Marines and Major Hay's 1st Battalion 8th Marines were cleaning out the Japanese pocket that still existed between beaches Red 1 and Red 2. This pocket had been resisting the advance of the Marines landing on Red 1 and Red 2 since D-day and they had not yet been able to move against it.
1/8 advanced on the pocket from the east (Red 2) while 3/2 advanced from the west (Red 1). Major Hewitt Adams led an infantry platoon supported by two pack howitzers from the lagoon into the Japanese positions to complete the encirclement. By noon the pocket had been reduced. On the eastern end of the island 3/6's L Company continued to advance, bypassing pockets of resistance and leaving them to be cleared out by tanks, engineers and air support.
By 13:00 they had reached the eastern tip of Betio. 3/6 killed roughly 475 Japanese soldiers on the morning of D+3 while losing 9 killed and 25 wounded. Back at the Red 1/Red 2 pocket there was no accurate count of Japanese dead.
There were an estimated 1,000 Japanese alive and fighting on the night of D+2, 500 on the morning of D+3 and only 50–100 left when the island was declared secure at 13:30 D+3.


.jpg)


.jpeg)

.jpeg)
Comments
Post a Comment